Monday, November 12, 2012

the winner of the blog candy is

Generator 17 

 Ok I put in 50 as the max- but when I copy and paste it puts 100- but the result is 17- so the winner is

OHHHHHHHHHHHHHHHHHHH YES. You definitely nailed this one.
I have used those same snowmen so many times, just love 'em.

Barbara- I may have your address in my stash of calling cards- but it would be easier for you to send me and email to mallodb@aol.com.


Saturday, November 10, 2012

Holly Jolly Blog Hop


I am so excited to be part of the Holly Jolly blog hop. Now that my daughter's wedding is over I hope to post a little more often.

 You should have come from Ken's Kreations but if you arrived some other way you can begin the hop by going to Kristen's blog My Fantaboulous Life.

For my post I decided to show off a card I created for my daughter and new son in law. Some may recognize it because I created it last year for the Circle meet-up in Greenville, SC. I received a lot of compliments so thought I would post for the Holly Jolly blog hop. 

 I used the Winter Woodlands for the snow people and the holly leaves. Joys of the Seasons for the for the snow-globe and Jolly Holidays for the "Winter Wishes".
I cut some fun foam to go under the edge of the globe to give it some depth so I could make the snow people more 3-D. I also used the swirling snow Cuttlebug folder which is one of the folders in the Winter Wonderland Set- on some clear acetate it is a little hard to see in the photos. For the "snow" inside I used some old T-shirt glitter that I had- it has large flakes and small stars. The card stock for most of the project is Bazzill Bling. The background paper behind the snow people was printed on the Imagine using the Mr. Frosty cartridge.
Your next stop is Scrapalette's blog  Around the Block.

I am giving away blog candy- $15 gift card to Michaels- just leave a comment and a way to contact you. I will select the winner using Random.org on Monday evening.


In case you need the entire line up I have included it below.
Kreimers http://fantabulouslypink.blogspot.com/
BetsyBoo http://www.betsymcreates.blogspot.com/
October Beauty http://www.macybella.blogspot.com/
Marcjo http://stampcutcreate.blogspot.com/
Ken’s Kreations www.kreativeken.blogspot.com
DarcyBeeler http://dlmbscrapping-time2create.blogspot.com/
Scrapalette http://scrapalette.blogspot.com/
Momtotwocuties http://www.inlovewithpaper.blogspot.com/
Greengirl www.michelegreen.com
Scrappin-Nanapuddin http://scrappin-nanapuddin.blogspot.com
CraftyScentiments http://craftyscentiments.blogspot.com/
CricutAddicted http://scrappingformorefun.blogspot.com/
Sis O’Snap http://papercraftscissors.com/
TerriSki http://scrappinwiththebug.blogspot.com/
Phantom Rink Rat http://addictedtothecricut.blogspot.com
TheCraftyTouch www.thecraftytouch.blogspot.com
HappyScrapper64 http://happyscrapper64.blogspot.com/
CraftySanSan http://1craftysansan.blogspot.com
MamaC http://cccscraproom.blogspot.com/
NadiaH-McConnell http://www.withglitteringeyes.com/

Thursday, July 19, 2012

Weekly Challenge #62 : Card Sketch Challenge.

The Challenge: Create a Cricut card using the card sketch provided below.
  Your project must be newly created for this challenge and include two Cricut Image cuts.

Here is the sketch:


This is my submission- I used this winter paper from Little Yellow Bicycle which I had purchased on sale and plan to make most of my holiday cards for my staff. Only 68 left to make. This was a nice clean sketch and I will probably use for all the cards. The two snowflakes were cut using 
Winter lace cartridge. 


Tuesday, July 3, 2012

A little something with no Cricut cuts

I created this card for a contest Echo Park Paper was having for the "Sweet Day" collections. I used my bird punch from Stamping Up and two circle dies from Lifestyle Craft. I cut two of the 5 inch circles for the card base- you can make shaped cards this way- cutting two shapes the same size then the one for the back just needs to be scored about a inch from the top and adhesive added to that portion between the score then two 4.75 inch circles out of the pattern papers. 


 Lastly I printed on a piece of patterned paper Miss You and cut out with the Lifestyle Crafts hexagon die and popped it up. I added Stickles to the clouds and birds. I love the way it turned out- it was so simple to do.

Tuesday, June 26, 2012

Cricle Cirle Monthly contest

The Challenge: Create a gift for baby using Cricut products.
Rules and Guidelines:  Your project must be newly created for this challenge and include at least 3 Cricut Image Cuts.

My baby gift is one I made for a colleague of mine- he is going to be a grandfather for the first time and he and his wife are so excited. I used one of the T-Shirt display shadow boxes that Micheal's has ( on sale of course)

 then I used Pretty Pennants cartridge for the banners, and Storybook for the little girl's name.

 The flowers are cut from the Flower Shop cartridge and I sewed and added Prima bling of course.
 All the papers are from Hobby Lobby's Paper Studio line and MME.  I actually made this for the grandparents as the new grandbaby lives several states away. I really enjoy making these shadowbox pages- I love to have the dimension.


  I also made a matching card using the Baby Steps cartridge.


Friday, June 8, 2012

Weekly Challenge #59: Birthday Challenge

Using a bouquet of birthday balloons as your inspiration, create a project of your choice using string in a creative way on your project somewhere. I used the string on the balloons- really love this little bird from CAC cartridge. 

Thursday, May 10, 2012

National Scrapbook Day challenges

For national scrapbook day the Cricut Circle Blog sponsored several challenges with prizes- I was able to complete three on them. The first was the Art Inspiration. http://cricutcircleblog.org/wp-content/uploads/2012/05/CropChallengeInfo_ArtInspiration.jpg


 I used Nursery Rhymes and Baby steps for this card.


The second was the Recipe challenge.
http://cricutcircleblog.org/wp-content/uploads/2012/05/CropChallengeInfo_Recipe.jpg
I decided to do another set of cards similar to the one I did with the Easter bunny- so this was pretty easy since I have now found such a fun technique for sewing on the cards- and actually end up with 6 fronts of cards when complete.


I used Flower Shoppe for the flowers, Martha Stewart Birthday for Happy Birthday and punches for the butterflies.


The last challenge I finished was the Something Old/Something New.
http://cricutcircleblog.org/wp-content/uploads/2012/05/CropChallengeInfo_Recipe.jpg


  I use the Wedding cartridge for the old one and Elegant Edges for the new one- after embellishing the card I was pretty happy with it.

Cricut Circle Magazine Banner Year Challenge


The challenge is to create any sort of banner you would like, just make sure to incorporate at least 4 Cricut Cuts. 

Great timing again- this gave me the motivation to complete the banner for my daughter's wedding this fall. She is going to have three girls 10, 8 and 7 in the wedding and wanted two to carry a banner saying "Here Comes the Bride".  So I watched You tube videos on cutting material with your Cricut- and it worked great. It was so easy that I decided to make it double sided so the girls could carry the other side out after the ceremony.


I used the Cricut Alphabet for Here Comes the and then used Quarter Note font for Bride. On the back I used Birthday Bash for Congratulations and Quarter Note for Britney & Wes. I am not done as I still want to add leaves (they are marrying in the fall) and two birds on the back. But I have plenty of time to finish.

Saturday, April 28, 2012

Cricut Circle Blog Monthly Challenge

Every good tablescape, whether it’s on a dining table, coffee table, side table, desk or elsewhere, can benefit from a beautiful centerpiece. Have you tried creating one with your Cricut machines? For the April Monthly Challenge that is exactly what we would like you to try! Create any type of centerpiece using your Cricut machines.

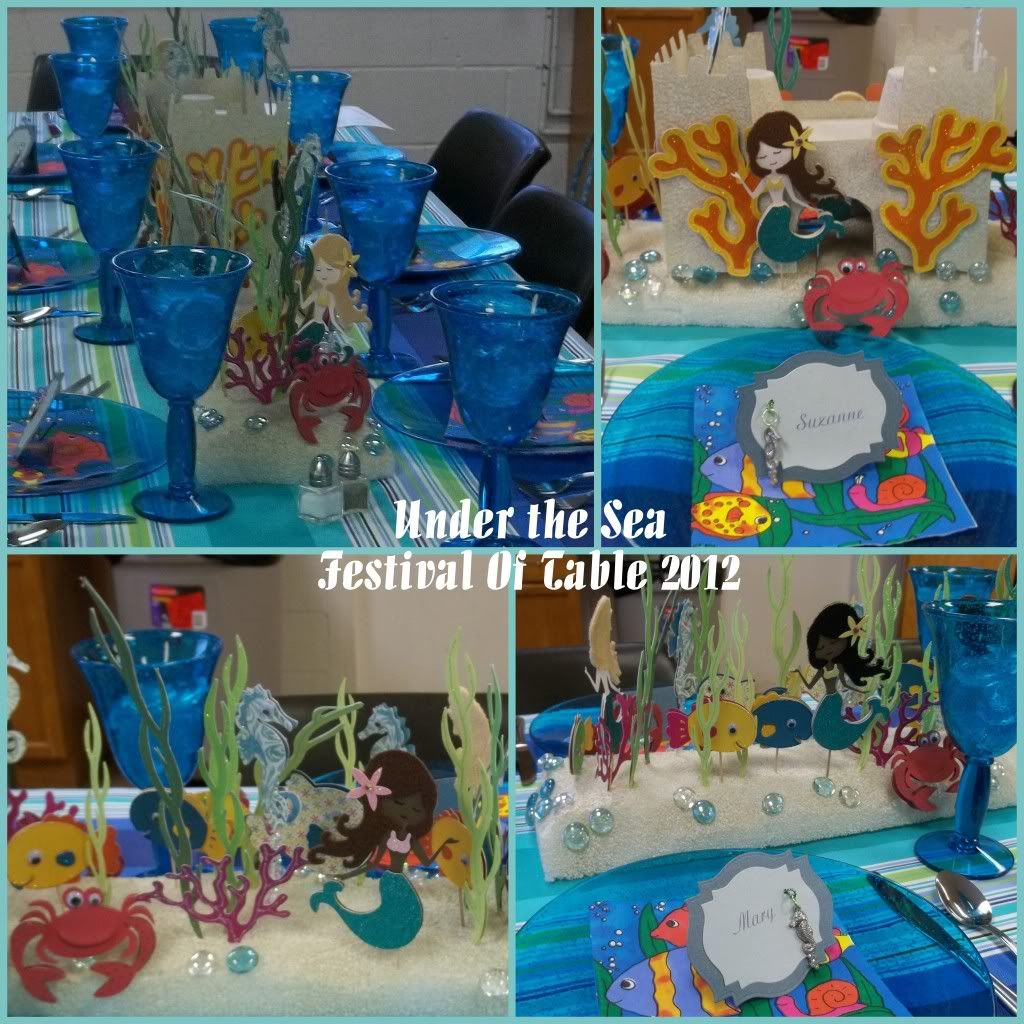
Well this was a great challenge because I was participating in our church's festival of the tables fund raiser- each year we about 10-13 ladies set up beautiful tables and invite guests for lunch and to listen to a speaker. My table was entitled "Under the Sea". It was inspired by the cute plates and glasses I picked up at 80% off at Hobby Lobby. I used a long piece of styrofoam (about 5 feet) and painted to look like sand then I created numerous under the sea creatures including fish, crabs, seahorses, seaweed and a mermaid for each person. I also did a sand castle. At the end of the luncheon I invited my guests to take the pieces home so they could use on scrapbook pages. I used Life's a Beach and Create a Critter for most of it.


Sunday, April 1, 2012

Weekly Challenge #55: Springtime Challenge!

Create a scrapbook page, card, home decor item, or other project with a Springtime theme. You must also incorporate ric rac and at least one sticker.

I created a card for the challenge- I had seen a video from Two Peas where they pieced together scraps and I decided this weekend to do that- but I started with Country Garden Collection by BoBunny 6x6 pages-selected 6 different patterns and cut all six pieces so I could create six different patchworks- I then used a sewing machine and zig zagged stitched the pieces. For this card I decided to cut the patchwork into the shape of an egg- I created a egg shaped card using Sophie cartridge and the egg shadow shape duplicated and welded the two pieces together.
  
I loved the decorative sugar eggs with the little scene inside when I was a child. So I went with that idea.
The grass is cut from The Martha Stewart seasonal cake card. The bunny and the Happy Easter were cut from the Easter 2010 cartridge. I used the rick rac on the bunny- much easier than a bow and the little decorated eggs, chicks, and flowers are all stickers from Sandylion. I had to use my Nestabilities to cut the oval through both the card and patchwork paper- I  then added the scalloped edge using the oval scalloped Nestibilities. Then added some rhinestones I have had for years. Love the way it turned out.


Posted by Picasa

Thursday, March 15, 2012

Weekly Circle Challenge- Wearing of the Green


The Challenge: Create a pin, necklace, bracelet or something else that you can wear on St. Patrick’s Day that includes the color green.


I have a friend at work who brings me a little something around St. Pats Day every year because she is really Irish and my birthday is on St. Patrick's Day. This year I wanted to create something for her. This challenge was perfect for that- I made a simple Shamrock Pin using my Imagine and Shrinky Dink material and then cut the coordinating card from the Spring Cards Cartridge to attach to the pin to.


 Many thanks to Nadia for her tutorial on shrinky dinks and using UTEE power to cover the charm. You can see Nadia's amazing blog here with glittering eyes . 


 I know I will be doing this again-I am afraid I may become a Shrinky Dink addict.

Friday, March 9, 2012

Cricut Magazine Sketch Challenge


For this challenge we had to use one of the sketches provided in  the Cricut Circle Magazine or on the Cricut Circle Blog.


I chose the sketch that was part of the 
February magazine, see above.
 My 25th wedding anniversary is in May so I decided I would work on a card for my husband. I usually don't give him fancy cards- they are usually funny- but I figured 25 years and silver anniversary deserved something special. I decided I only wanted to use one cartridge. 
I used the Sophisticate cartridge. I love the font with the cutout swirls in it, plus it had so many pretty words that went perfectly with my theme. The papers are by Best Creations, Bazzill and DCWV. 
I hope he likes it- now to find a gift to go along with it.


Here is my interpretation of the sketch

Sunday, March 4, 2012

March Cricut Circle Challenge


March is National Craft Month. This month, we want you to display your passion for your craft by creating a piece of wall art to display in your home, office, or wherever! The topic can be whatever you wish . . . 
just use your craftiness to make something you can display and share with others.
Create a piece of wall art (canvas, art board, sign, vinyl directly on wall, framed art, shadow box, etc.). Use at least three colors.

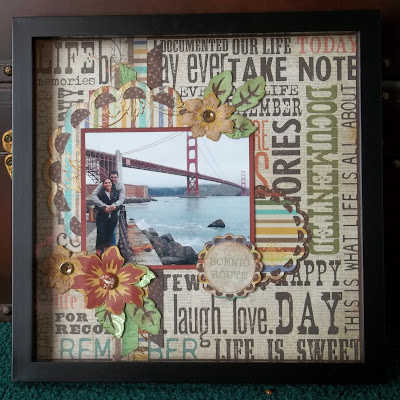
This was right up my alley because about a year ago I decided I did not want to hide all my scrapbook pages in books so I decided to put them in shadow boxes and line my upstairs hallway with them. I have pages with photos from 1920's through current. This page is of my daughter and her fiance- I had none up of the two of them so decided it was time and this challenge spurred me on. I use the T-shirt shadow boxes that Michaels has-they usually have great sales and (you can get them from $4-$5) and they are perfect for a 12x12 page. 
Plus I love that I can add more dimension with big brads and layers.


The papers are from Simple Stories and from Paper Studios- I think I met the challenge of at least three colors- the predominate of which are brown, beige green and red with some gold and blues.

I used Elegant Edges cartridge for the scalloped circles and Picturesque for the the flowers and the leaves.

Posted by Picasa